.webp)
- Film editing is the invisible art that shapes narrative, controls pacing, and guides emotional experience through strategic assembly of footage
- Basic techniques include continuity editing (cutting on action, eyeline matching, 180° rule), jump cuts for disruption, and transition shots (fades, dissolves, wipes)
- Advanced techniques like montage, cross-cutting, and parallel editing compress time, build suspense, and create thematic connections
- LTX Studio's editing tools enable testing narrative flow, shot sequencing, and emotional pacing during pre-production before filming begins
The renowned French filmmaker Robert Bresson famously said, "A film is born three times." First in the writing of the script, once again in the process of shooting, and finally in the editing room.
This sentiment has become ingrained in the filmmaking ethos, emphasizing just how vital the editing process is to shaping a compelling narrative.
Film editing is the backbone of storytelling, but it's also a kind of invisible art. If it's done well, you may not even notice it, but you will feel its impact.
This is one of the many reasons so many notable directors edit their own work, and why you often hear in Oscars buzz that the Best Film Editing award can be a tell for who will win Best Picture.
This year, Sean Baker, who took home the Best Picture award for his film Anora, also won Best Film Editing. In his acceptance speech, he emphasized just how crucial editing is, claiming that he "saved the film during the edit."
He went on to share that he considers editing to be half of his directing and one third of his screenwriting, a perspective that affirms what many filmmakers and creators already know: editing isn't just a technical necessity, it's a creative engine that reshapes the story.
What is Film Editing?
Film editing is the process of assembling, trimming, and creating sequences to construct a compelling narrative. A film's edit transforms raw footage into a cohesive story, guiding the audience's emotional journey and defining the story's arc.
It's important to note that this doesn't only apply to movies but also to advertisements, music videos, and even social content. While editing, you choreograph three essential elements:
- Structure ensures the story flows logically and coherently
- Rhythm defines the pacing of scenes and the emotional tempo
- Tone highlights the mood, whether it's an Aaron Sorkin-like quip or David Lynch's slow and surreal unraveling
These core elements determine how audiences interpret and experience a film's emotional depth.
New technologies and AI-powered solutions are accelerating and changing the editing workflow by enabling almost immediate concept visualization. Tools like LTX Studio allow filmmakers to storyboard, script, and refine visuals all within a single, unified environment.
From an editing perspective, this is a powerful advantage: a clear storyboard lays the groundwork for a more intentional edit and can save you time during other phases of the production process.
Why Film Editing is an Art Form
Filmmaking is an exceptionally collaborative effort, but an editor plays a unique role as the storyteller's final sculptor. Working closely with directors, editors slice hours of raw footage into sequences, constantly balancing technical skill with creative intuition.
This delicate combination is what truly differentiates film editing as an artistic craft rather than mere technical assembly. Editors don't just connect shots.
They control how audiences experience time, manipulate emotional responses through pacing and juxtaposition, create meaning through sequence rather than individual images, and shape narrative comprehension through strategic information revelation.
The editor's choices determine whether a film feels tense or relaxed, whether audiences connect emotionally with characters, whether plot developments feel earned or arbitrary, and whether the viewing experience flows smoothly or feels disjointed.
Now, let's explore some of the techniques that form the foundation of film editing styles.
Basic Film Editing Techniques
While there are a vast amount of foundational techniques used by editors to maintain coherence and visual flow in storytelling, we'll take some time to review some of the basic film editing techniques before diving into more complex methods of visual storytelling.
Continuity Editing
Continuity editing maintains consistency in time, space, and sequence, ensuring the viewer remains immersed in a unified, believable story world. Some core continuity editing techniques include:
Cutting on Action
Cuts from one shot to another while preserving the movement's continuity. When a character reaches for a door handle in one shot, the cut happens mid-movement, and the next shot continues that same action. This makes the edit nearly invisible because the eye follows motion rather than noticing the cut.
Eyeline Matching
Aligns characters' gazes so they appear to be looking at or engaging with the same object or person. If Character A looks screen-right in one shot, Character B should be looking screen-left in the reverse shot. This spatial logic helps audiences understand character relationships and maintain orientation.
The 180° Rule
Keeps all camera angles on one side of an imaginary line to preserve story coherence. There are many famous disruptions of this rule in film history, demonstrating how breaking the rule can unsettle viewers.
Continuity editing is the backbone of visual storytelling. If your edit lacks necessary continuity, it will take the viewer out of the story. LTX Studio can help ensure continuity with tools like camera control and composition. By experimenting with camera control and composition, you have the ability to see how frames will fit together before you've hit the ground running.
Jump Cuts
Unlike continuity editing, where cuts are made to feel invisible, jump cuts are often meant to be noticed or felt. This technique is effective for:
- Accelerating pacing to build urgency
- Creating disorientation or narrative tension
- Adding a deliberate, stylistic edge
In a traditional editing workflow, a jump cut occurs when a portion of a clip is removed, splicing together the beginning and end of the shot and causing a noticeable "jump" in the action. To create the feeling of a jump cut, editors may place two similar shots next to each other in a sequence.
For instance, both shots may feature the same characters in a medium close-up, but with a slightly different camera placement or shooting angle. The discontinuity creates visual disruption that draws attention to the edit itself, breaking the fourth wall of seamless storytelling.
Transition Shots in Film
Transitions act as visual bridges between scenes or moments, each carrying its own emotional weight and stylistic intent:
Fades
Suggest closure or a tonal shift in the story. Fades to black signal endings, scene breaks, or passage of time. Fades from black introduce new sequences.
Dissolves
Imply a passage of time, a dream-like quality, or can be used as an aesthetic choice. One image gradually blends into another, creating smooth temporal or thematic transitions.
Wipes
Create bold stylistic shifts or action-oriented scene changes. The image appears to be "wiped" away by the incoming shot, often used in action films or genre pieces where overt transitions match the energetic tone.
Remember: in film, there are no unbreakable rules. Transition shots are simply cinematic tools meant to move the viewer from one idea to the next. A fade can imply the passage of time just as easily as a dissolve or a wipe can. It all depends on how the moment is framed in the larger narrative.
To explore the emotional impact among different transition shots, try experimenting with fades, dissolves, and wipes using LTX Studio's tools.
Advanced & Cinematic Editing Techniques
There are so many different techniques in film editing, but to showcase how editing can shape a story, here are some of the most used, advanced techniques below.
Montage Editing Techniques
Montage editing, coined by early Soviet filmmakers, is used to compress time and build emotional impact. A montage sequence often illustrates the passage of time, reinforces a character's routine, or shows emotional and narrative development such as character growth or evolving relationships.
Classic montage applications include training sequences in sports films (like the iconic Rocky training montage), character transformation over weeks or months, skill development or learning progression, and relationship evolution condensed into minutes.
Montages work by combining a series of short shots or clips into one sequence, often set to music. The rapid cuts communicate information quickly while maintaining emotional momentum.
Cross Cutting & Parallel Editing in Film
Cross cutting is an editing technique that illustrates actions happening simultaneously in different locations. While cross cutting builds tension (such as in an action sequence), parallel editing often creates comparisons or dramatic irony.
| Technique | Purpose | Key Characteristic | Example |
|---|---|---|---|
| Cross Cutting | Build suspense | Rapidly alternates between simultaneous events | Bomb countdown intercut with defusal attempt |
| Parallel Editing | Create thematic comparison | Juxtaposes related scenes (may be different times) | Training montage showing contrasting methods |
| Montage | Compress time | Rapid sequence of short shots | Character growth over months in minutes |
For example, cross cutting can be used as an editing technique to build momentum in an action sequence by showing different characters engaged in different actions but working toward the same goal.
Classic cross-cutting example: The Godfather's baptism scene intercutting religious ceremony with violent murders. The juxtaposition creates intensity impossible with linear storytelling.
Parallel editing example: Rocky IV training montage contrasting Rocky's natural training with Drago's technological approach. The parallel cuts illustrate differences between fighters while suggesting similar determination.
Parallel editing is also a technique that can be used to create suspense, but is more commonly used to emphasize comparative or symbolic relationships between scenes.
Editing Techniques in Action Films
Editing in action films is all about pacing, rhythm, and building momentum. Sharp cuts, quick transitions, and visually cohesive camera angles ensure clarity amidst chaos.
Action editing requires maintaining spatial geography so audiences understand where characters are, preserving continuity despite rapid cuts, building intensity through accelerating cut frequency, and using dynamic camera angles that enhance rather than confuse action.
With LTX Studio's storyboard feature, editors can visualize each moment frame by frame, mapping out sequences and camera movement before production begins. In the storyboard view, you can visualize how you're imagining each scene.
Then, use the Composition Tool in the Motion Editor workspace to simulate movement or adjust camera angles to ensure eyeline matches and visual coherence.
This is the perfect time to test out some of the different editing techniques reviewed above. If you're imagining a fast-paced action sequence that cuts between multiple characters or locations, try experimenting with cross cutting or jump cuts to intensify momentum.
Explore how different transitions shift the tone between scenes and see how even subtle changes in rhythm or pacing can influence the emotional impact.
Different Editing Styles in Film
Employing different editing styles shapes the tone, pacing, and overall feel of a film. Whether you're using jump cuts to disrupt continuity or classic continuity editing techniques, the way you weave your story together directly influences how viewers interpret the narrative.
In this section, we'll explore impactful approaches that demonstrate how editing styles in film can enhance meaning, rhythm, and emotion.
Thematic & Rhythmic Editing
Thematic editing connects ideas visually, emphasizing motifs and deeper meanings. Rhythmic editing aligns the timing of cuts with the music, action, or dialogue.
A common example of rhythmic editing is in real estate videos, where editors often cut on the down beats of the music track. You'll notice this in all kinds of visual material you consume on a daily basis, from social media ads to car commercials.
This kind of editing technique is a kind of visual representation of the music, almost as if you're watching a music video rather than an ad whose sole purpose is to get you to buy something.
The cuts become choreography. The edit follows musical structure. Visual changes sync with auditory rhythm, creating unified audiovisual experience.
The Kuleshov Effect & Emotional Editing
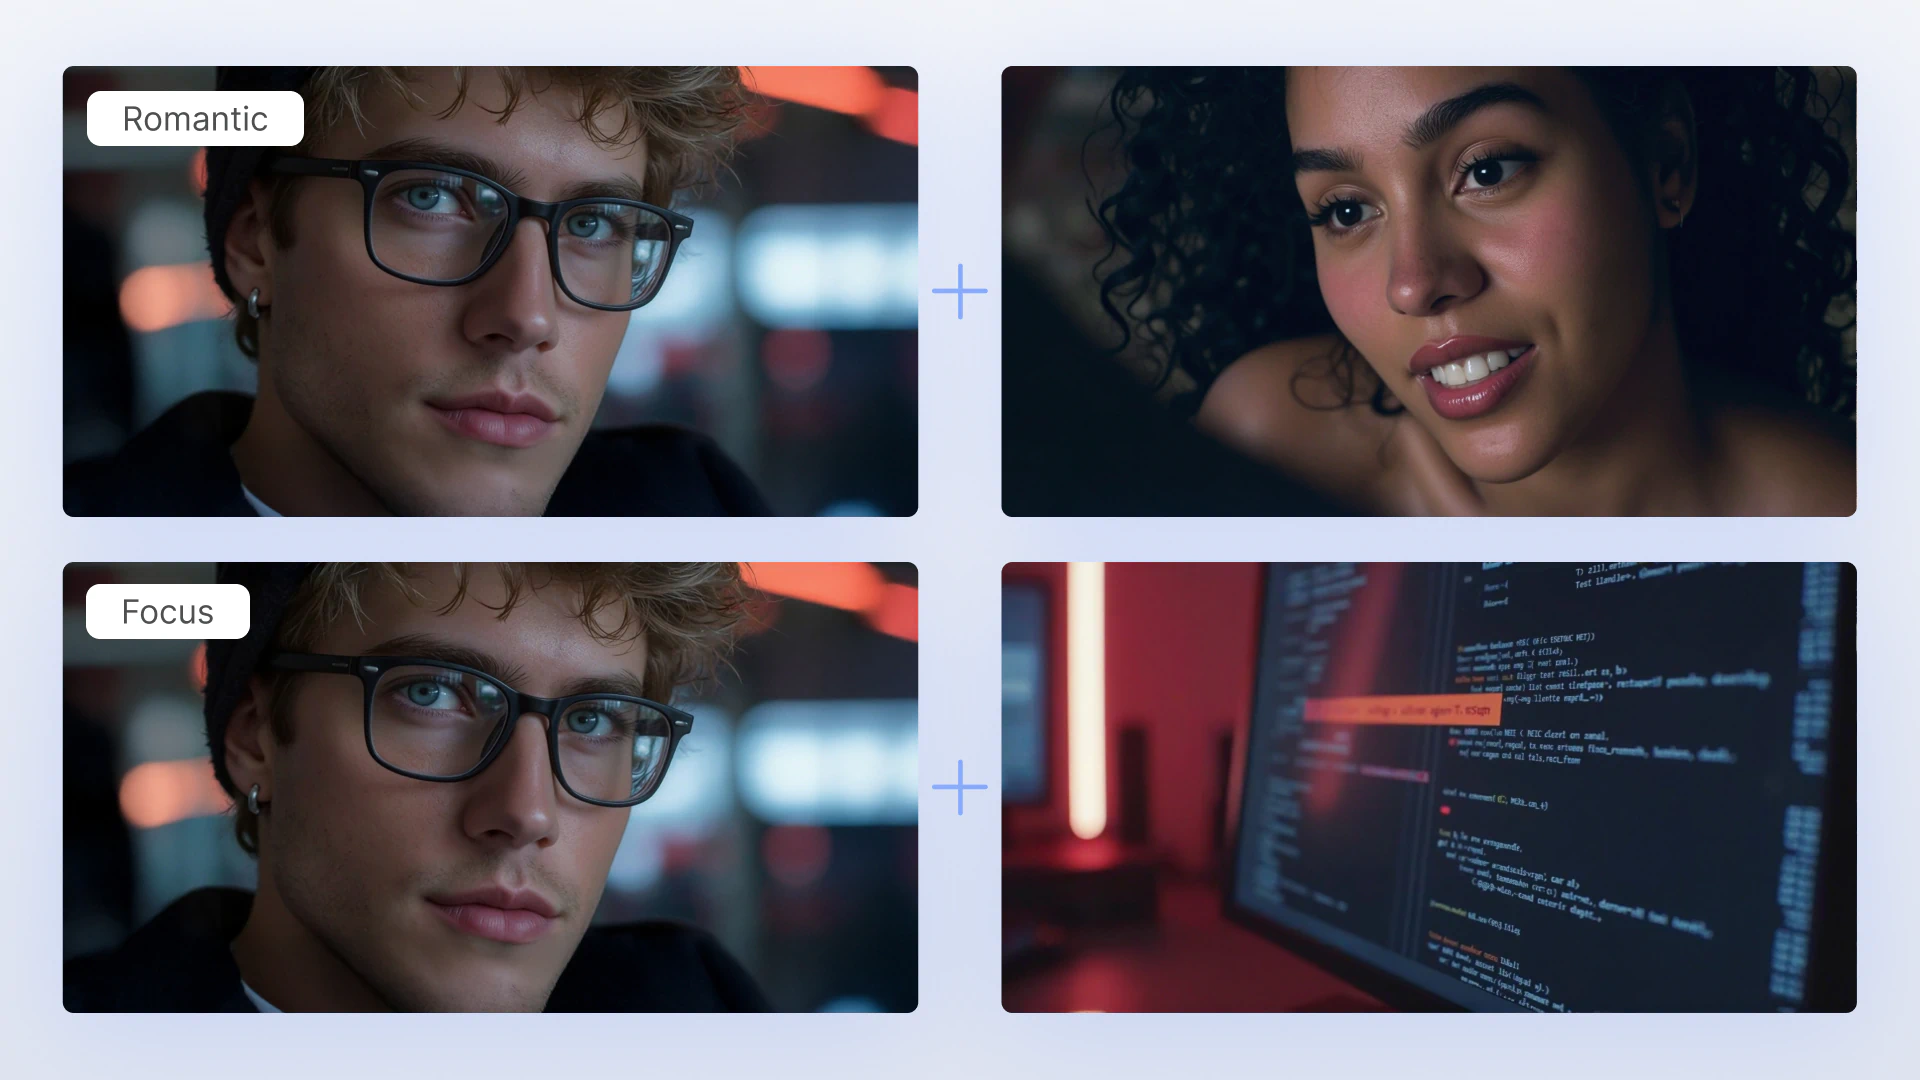
Soviet film-maker Lev Kuleshov created this film editing technique in the 1900s. It is a phenomenon by which viewers derive more meaning from the interaction of two sequential shots than from a single shot in isolation.
In essence, a character's expression takes on new significance depending on the shot that follows or precedes it, creating an emotional experience shaped by the edit.
This effect highlights one of film's most powerful tools: the ability to shape perception not just through what is shown, but through the order in which it's shown. The sequence itself becomes part of the meaning.
Unlike a single still image, a film's emotional arc is formed through juxtaposition.
The editor controls how that emotional logic unfolds. A neutral facial expression reads as hunger when followed by a shot of food, grief when followed by a coffin, or desire when followed by an attractive person. The face doesn't change. The interpretation does.
The Art & Technique of Film Editing
Editing isn't just assembling clips. It's a craft. Much like a screenwriter uses words to develop characters and plot, editors build narrative through timing, tone, and sequence.
Every decision, from the length of a pause to the sequence of shots, can shift how a viewer experiences the scene.
The editor determines what information audiences receive and when, controls the emotional intensity through pacing and juxtaposition, establishes narrative cause and effect through sequential logic, and creates meaning through association rather than explicit statement.
This is why many directors consider editing half of directing and a third of screenwriting. The edit fundamentally reshapes what was shot into what gets experienced.
Mastering Film Editing with LTX Studio
Traditional editing is a time-consuming process, including tedious workflows, complex decision-making, and resource-intensive processes.
Solutions like LTX Studio's AI-powered platform support filmmakers, ad agencies, and creative professionals at every stage of the visual storytelling journey by streamlining the process.
Pre-Visualizing Editing Decisions
LTX Studio tools, such as the storyboard workspace, allow you to rearrange shots and test narrative flow before production begins. This means you can experiment with editing techniques during planning rather than discovering problems in post-production.
Test different shot sequences, explore how jump cuts affect pacing, evaluate transition timing between scenes, and identify continuity issues before filming.
Shot Editor for Precision Control
The Shot Video Editor empowers you to either preserve continuity or break it intentionally. Apply continuity principles like eyeline matching and cutting on action, or deliberately disrupt continuity for stylistic effect.
Rules like the Kuleshov effect are easy to emulate using LTX Studio's tools. Use the Face Expression tool in the storyboard to craft character sentiment, or place each frame in relation to other events in the narrative to simulate emotional or thematic relationships.
Iterative Refinement
Traditional editing requires commitment. Once you shoot footage, you're limited to what exists. LTX Studio's approach enables generating alternate versions of shots, testing different emotional registers, experimenting with pacing variations, and refining sequences based on how they flow together.
This iterative capability transforms editing from problem-solving (making the best of what you shot) into creative optimization (achieving exactly what serves your story).
Streamlined Workflow
By combining creative control with AI-powered video editing tools, LTX Studio streamlines your workflow all in one platform, giving you the flexibility to iterate, refine, and bring your vision to life with precision.
Generate initial sequences from scripts through text-to-video capabilities. Adjust pacing and timing across scenes. Test different editing approaches. Export when satisfied with narrative flow.
This consolidated workflow eliminates the disconnection between pre-production planning, production execution, and post-production editing.
Conclusion
Film editing shapes storytelling in ways audiences feel but rarely consciously notice. The techniques discussed here—from continuity editing that maintains spatial logic to cross cutting that builds suspense through parallel action—represent the fundamental vocabulary editors use to craft emotional experiences.
Understanding these techniques benefits both creators and audiences. Filmmakers gain tools for strategic storytelling. Viewers develop appreciation for the invisible art shaping their emotional journey through films.
Traditional editing requires extensive post-production work assembling footage into cohesive narratives.
Modern tools like LTX Studio enable testing editing decisions during pre-production, visualizing how sequences will flow before filming begins, and refining narrative structure iteratively rather than making irreversible commitments during production.
Whether you're cutting a feature film, creating social content, or producing advertisements, mastering editing techniques transforms footage into stories that resonate.
Ready to explore how editing techniques shape your creative projects? Start visualizing narrative flow with LTX Studio's editing and storyboard tools.
Related posts

Film Editing Techniques FAQs
What are the basic film editing techniques every filmmaker should know?
Basic film editing techniques include continuity editing (cutting on action, eyeline matching, and the 180° rule) to maintain consistency, jump cuts for accelerating pacing and creating tension, and transition shots like fades for closure, dissolves for time passage, and wipes for stylistic shifts between scenes.
What are advanced cinematic editing techniques?
Advanced techniques include montage editing to compress time and build emotional impact, cross cutting to show simultaneous actions in different locations for tension, parallel editing to create dramatic irony through comparative relationships, and thematic and rhythmic editing that aligns cuts with music or emphasizes visual motifs.
How does LTX Studio help with film editing techniques?
LTX Studio's Storyboard workspace allows you to rearrange shots and test narrative flow, the Shot Video Editor helps preserve or intentionally break continuity, the Face Expression tool crafts character sentiment, and the Composition Tool simulates movement to ensure eyeline matches and visual coherence for testing editing techniques before production.